
![]()
![]()
Rebuilding the Hobie Rudder Cam Assembly
..Return to DSC hobie LIBRARY Page
Controlling When and Where Your Rudders Kick Up
by Gary Willcox
Also with Discovery Sailing Old Library
Last month's On The Wire discussed rudder slop and how to eliminate it. Let's discuss another important rudder topic - the Hobie rudder cam assembly. The goals are to adjust cam tension easily and have a positive locking rudder cam. This article will deal specifically with the Hobie 16 rudder system, but the techniques and methods can apply to other boats as well.
Symptoms of improper cam tension cause the rudders to kick up in heavy weather sailing, or not kick up when the rudders strike the beach. Few things are as aggravating as having the rudders pop up unexpectedly when sailing in heavy weather or when you accidentally
strike a stick or object in the water. You also don't want to have the cam so tight as to rip out a gudgeon when forgetting to raise rudders when beaching your cat.
"Few things are as aggravating as having the rudders pop up unexpectedly..."
We want to be able to control when and where our rudders kick up. One successful Hobie 16 racer I know uses the "troll and release" method when racing (weekly, local, casual races). The lake they sail on has a lot of plant growth. If he sees a buildup of plants on his rudders, he waits until just before the next mark when the competition is right behind him. He then reaches back and pops a rudder or two and gives his friend a "present." Now that is what I call rudder control.
One of the biggest obstacles to getting proper cam tension is the 3/4" delrin adjusting screw. This screw will "freeze up" in the rudder casting threads. It is also very easy to strip out the V slot in the screw with your screw driver when trying to adjust or remove it. You then have a delrin screw trapped in your rudder casting that can't be adjusted or removed.
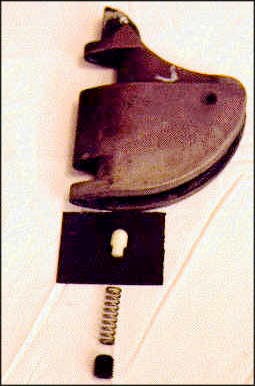
Our goal is to remove this delrin screw, freshen the threads for the delrin screw, replace the four Hobie rudder cam mechanism parts, and properly adjust the rudder cam tension.
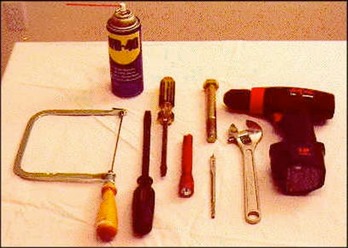
The tools needed to rebuild this system are: a large screwdriver about 8" long with a 3/8" slotted head; a small screwdriver about 6" long with a 1/4" slotted head; a drill; standard drill bits; a 3/8" x 6" wood boring drill bit; a large bolt (3/4" x 6 1/2" - #10 threads); a large wrench or socket to drive the


large bolt; WD40 lubricant; a flashlight; and perhaps a coping saw.
The large bolt should be double checked for thread size by holding it up next to the delrin screw. You will want to purchase the hardened automotive variety bolt so that the threads will hold up better than the cheaper versions. I paid about $4 for mine.
The Hobie parts needed for this rebuild are: delrin screw, spring, and plunger kit (you will need two kits for about $12 each). While you are at it, you should probably install new rudder cams. You can tell if you need new ones if the top lip is bent or soft. If you have a Hobie dealer nearby, just compare your old one to a new one side by side. If you have cams held in place with rivets, you will also need the sleeve that screws into place since you will be drilling out your old rivet sleeves. I believe the kit with two cams and two screw style sleeves are about $12.
Hobie cam rebuild steps:
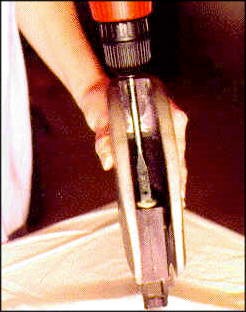
1. Remove the rudder assembly from the boat and remove the rudder and rudder arm.

2. Remove the rudder cam by unscrewing or drilling out the sleeve (depending on which style you have)...Caution, do not slip and drill the aluminum casting, Otherwise you will take an hour to create & fit a flange edge bushing.

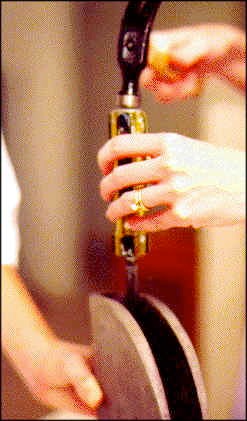
3. Drill out the delrin screw with the 3/8" wood boring bit. It is plastic, and should disintegrate. Pick out the remainder,
TIP: Do not damage the threads in the Casting. You can brush these clean with a "Gun Barrel" steel or brass brush.
4. Chip out the excess delrin remains with the small blade screwdriver.
5. Remove the spring and plunger from the casting.
TIP: When you do not need a new Hobi OEM casting:
At this point you may determine that the shaft where the white nylon cam follower slides is worn too lagre a diameter by sand. The Cam follower will flop in the shaft as it hits the Cam and not slide, even if greased. Aside from thinking you can rebuild the shaft insides with Epoxy Steel, the solution really is to get a Nylon Rod of the same diameter from a Plastic supply wharhouse / shop, and put it on a lathe. You will then manufacture your own cam follower which is 1/4 to 1/2 inch longer. This will not jam in the shaft ever, and you can back out the Delrin screw by the 1/4 to 1/2 inch.
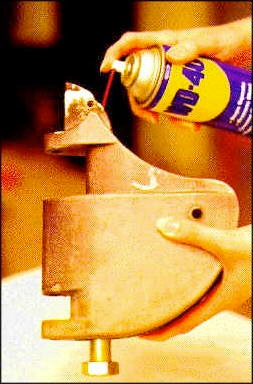
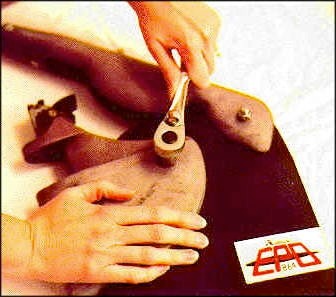
6. Spray the 3/4 bolt with WD40 and insert into lower end of casting. Spray additional WD40 into top of casting hole.
TIP: WD40 was made for removing water from rocket fuel tanks, it is not a lubricant. There are real penetrating oils which do not dissolve plastic. There are better silicone & wax products at the Mountain Bike Store for Chain lube - that will not attract and hold sand and dust.
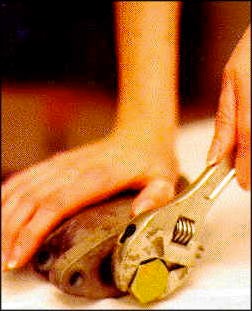
7. Work bolt in and out until the bolt can be rotated easily. Look down the top of the casting hole with a flashlight to make sure that the bolt is passing through all of the threads, but no further. On my Hobie 16 casting, the bolt was inserted completely when I had about 1/2 inch of bolt left on the bottom of the casting.
8. Flush out casting hole with water. Air or force dry.
9. Insert new plunger, spring, and delrin screw from the bottom of the casting. Lubricate top of the plunger with a non-staining water resistant grease.

10. Put that beer down until you finish, this is where you can stab a finger.
10. Attach cam and cam screw sleeve.

11. Attach rudder and rudder arm using David Halls "rudder slop" reduction techniques described last month.
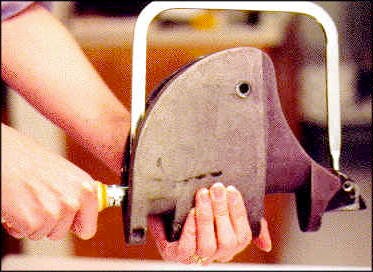
If the delrin screw needs additional work to remove, insert a coping saw through the hole in the casting. Make about 4 small 90 degree grooves to weaken the wall of the delrin screw. Just be careful that you do not damage the threads.
With the rudder in the down position and the cam locked down, adjust the rudder locking plate
on the rudder arm so that it is snug against the rudder cam lip. This will ensure that the plate will catch the cam and flip it up not leaving the cam in the locked position with the rudder arm up.
Next, attach the rudder assembly to the boat using the rudder pins. Adjust the delrin screw so that the rudder kicks up with a swift blow with your foot. If you wish to be more exact, a fish scale can be used to get both rudders adjusted the same. Just tie a loop of line around the rudder about 7" from the bottom and pull with a fish scale. Adjust both rudders by adjusting the delrin screw (now an easy task) to about 17-26 pounds of force before they pop up.
You will also want to make sure that you adjust the rudders using the adjusters on the rudder cross bar so that they are parallel (or for a Hobie 14 or 16, they are toed in about 1/8"). This can be measured with the rudders in the locked down position measuring leading edge to leading edge and trailing edge to trailing edge.
That's it. Take the finished rudders out for a spin. Bring along your mammoth screw driver, and sockets so you can adjust the delrin screw and the rudder locking plate. Your rudders should lock and unlock flawlessly, never leave the cam locked with the rudder arm up, and should kick up when you want them.
Gary Willcox
memphis@one.net
Hobie 16 #911 hobie911@hotmail.com
Acknowledgments are due to Matt Miller of Hobie Cat for the specs in this article; David Hall for suggesting a bolt instead of a tap for the thread freshening; my local Hobie Cat dealer Strictly Sail in Cincinnati, OH for always having Hobie parts on hand; various Hobie mail list subscribers for giving insights and tips; and my wife, Mary, for her text proofing and hand modeling.
Back to Features